- Home
- Solutions
- Integrations
- How to Connect Google Workspace to Zluri Using a Custom Admin Role
How to Connect Google Workspace to Zluri Using a Custom Admin Role
If you wish to delegate Zluri’s Google Workspace integration to a user or group without Super admin credentials, you can assign them a custom admin role. This method requires more manual configuration, but gives greater control over the Zluri features you wish to use.
? This article explains how to create a role with the bare minimum privileges to connect Google Workspace to Zluri. To learn more about the additional capabilities, see Scopes for Google Workspace.
Prerequisites
- A Business Starter, Business Standard, Business Plus, or Enterprise plan. You can find your payment plan by following these instructions.
- Super admin credentials in Google Workspace.
Integration steps
Create a custom admin role
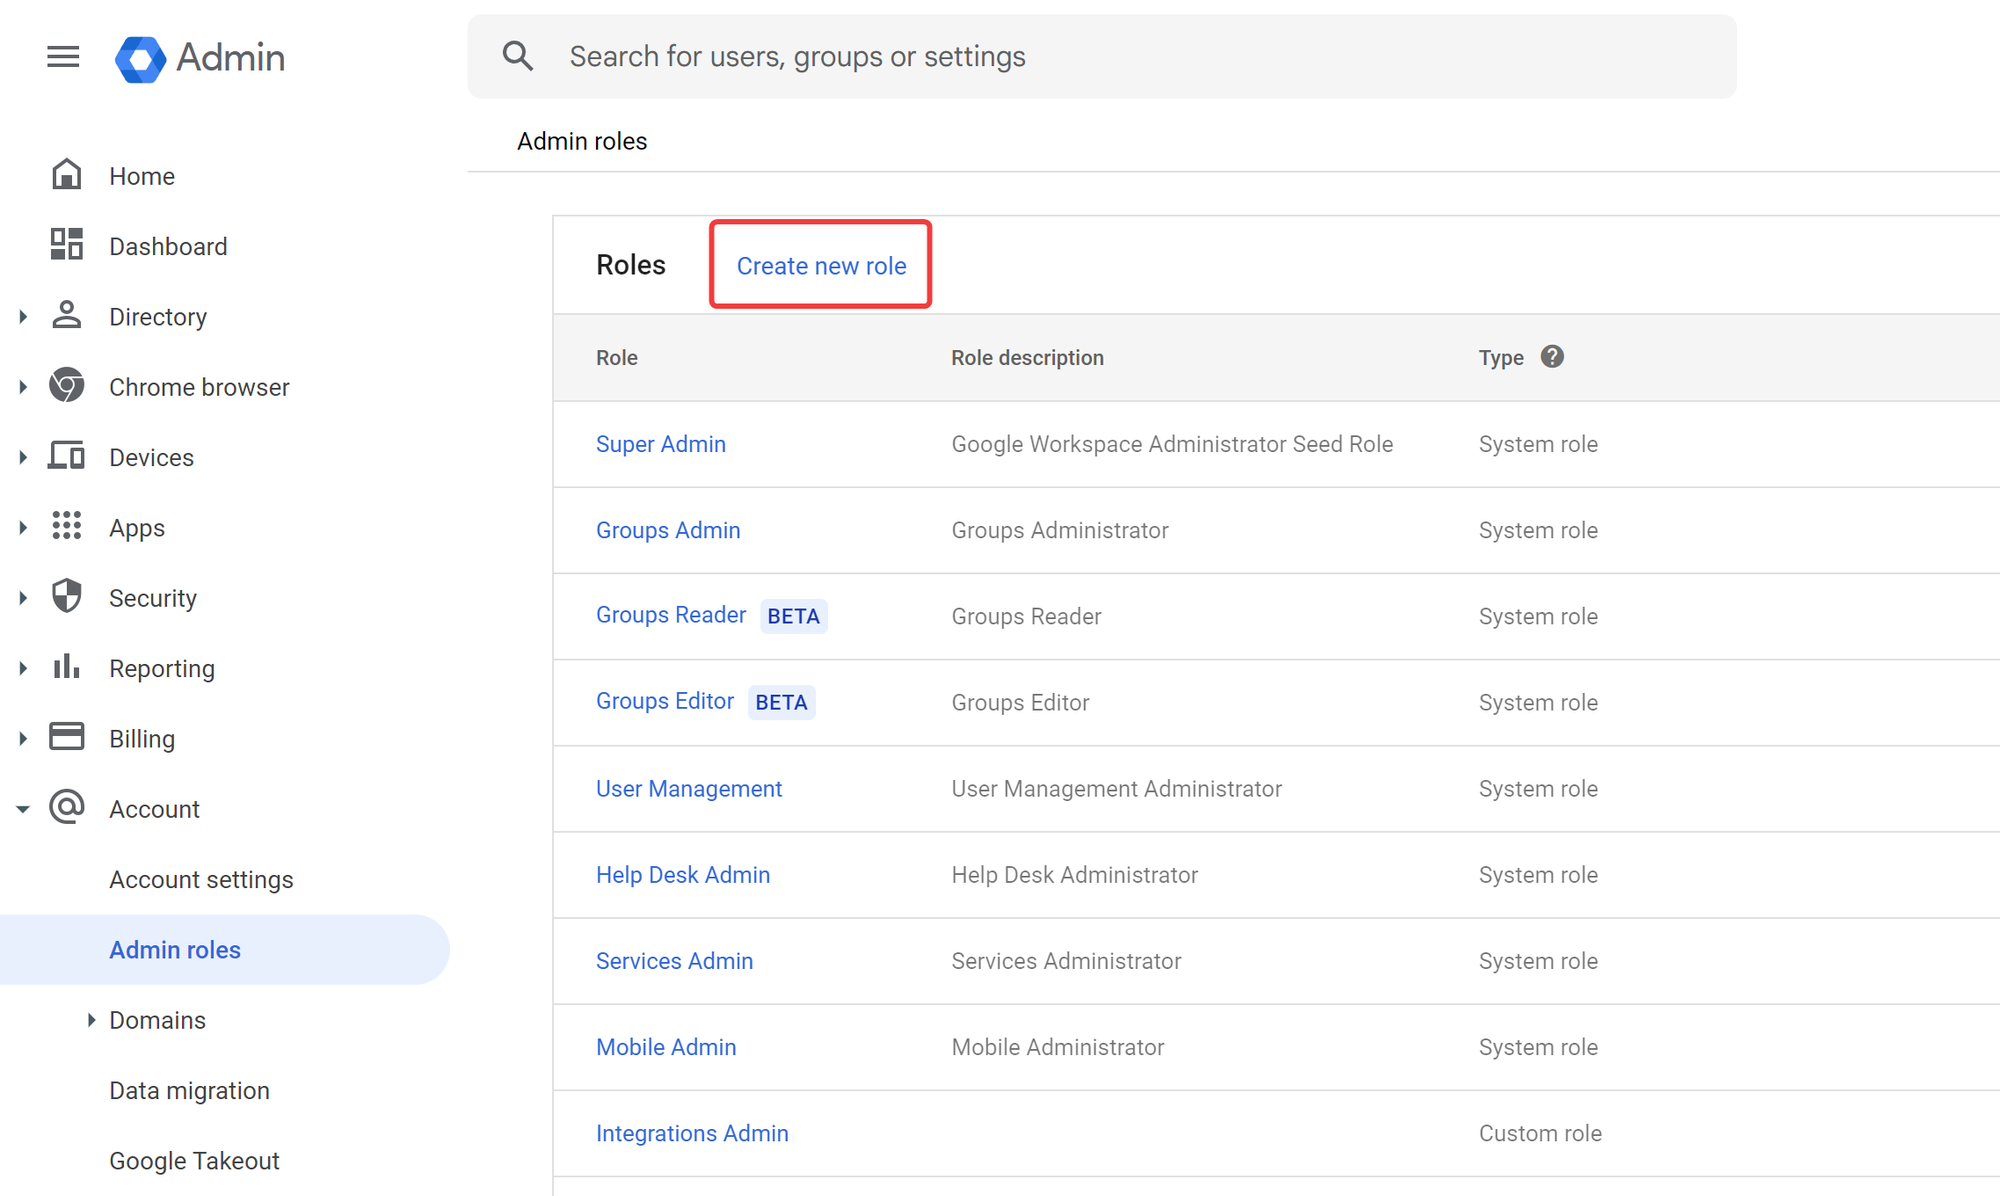
1. Login to the Admin Dashboard, and navigate to Accounts → Admin Roles in the left sidebar.
2. Click Create new role.
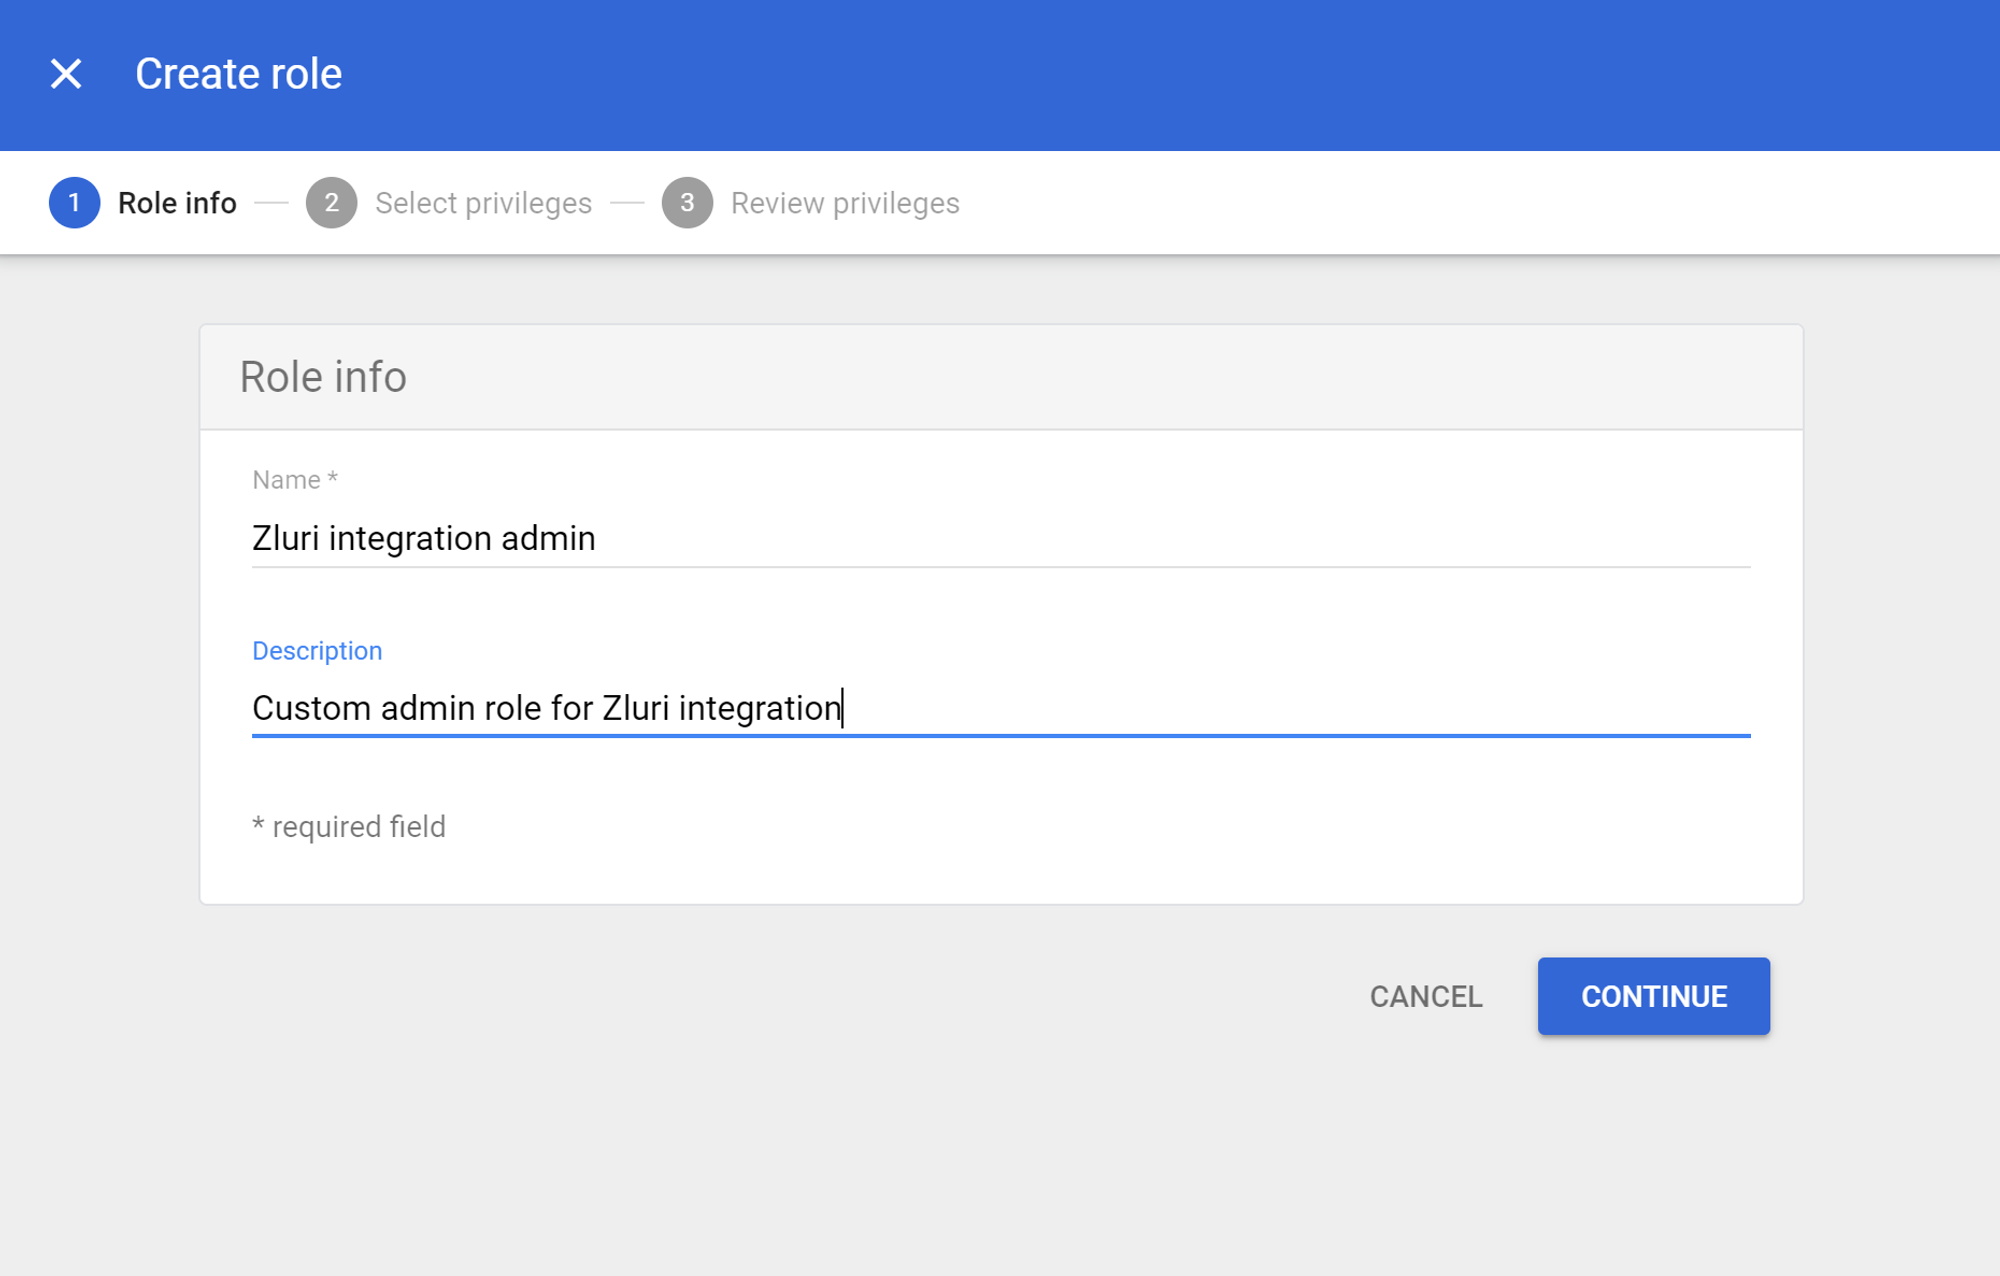
3. Give the role a name and description, and click Continue.
4. In the Select privileges step, choose one set of permissions from the table below.
Minimum required privileges: These are the minimum required privileges required for a connection. They enable features like user discovery, identifying opportunities for cost optimization, and fetching role information for conducting access reviews
Maximum required privileges: These let you use every feature that Zluri offers including workflow-related actions such as automated onboarding and offboarding, access remediation, and running continuous optimization workflows.
| Minimum required privileges | Maximum required privileges | |
|---|---|---|
| Admin console privileges | Organizational units: Read Users: Read Domain Settings Reports Security: User Security Management Security: Security Setting | Organizational units: Read, Write Users: Read, Write Domain Settings Reports Security: User Security Management Security: Security Setting |
| Admin API Privileges | User Security Management Billing management: Billing Read Domain Management Groups: Read License Management: License Read Organization Units: Read Domain Allowlist Management: Domain Allowlist Read Users: Read | User Security Management Billing management: Billing Read Domain Management Groups: Read, Write License Management: License Read, License Write Organization Units: Read, Write Domain Allowlist Management: Domain Allowlist Read, Domain Allowlist Write Users: Read, Write |
5. Click Continue, review the privileges, and click Create role.
Assign the role to a user or group
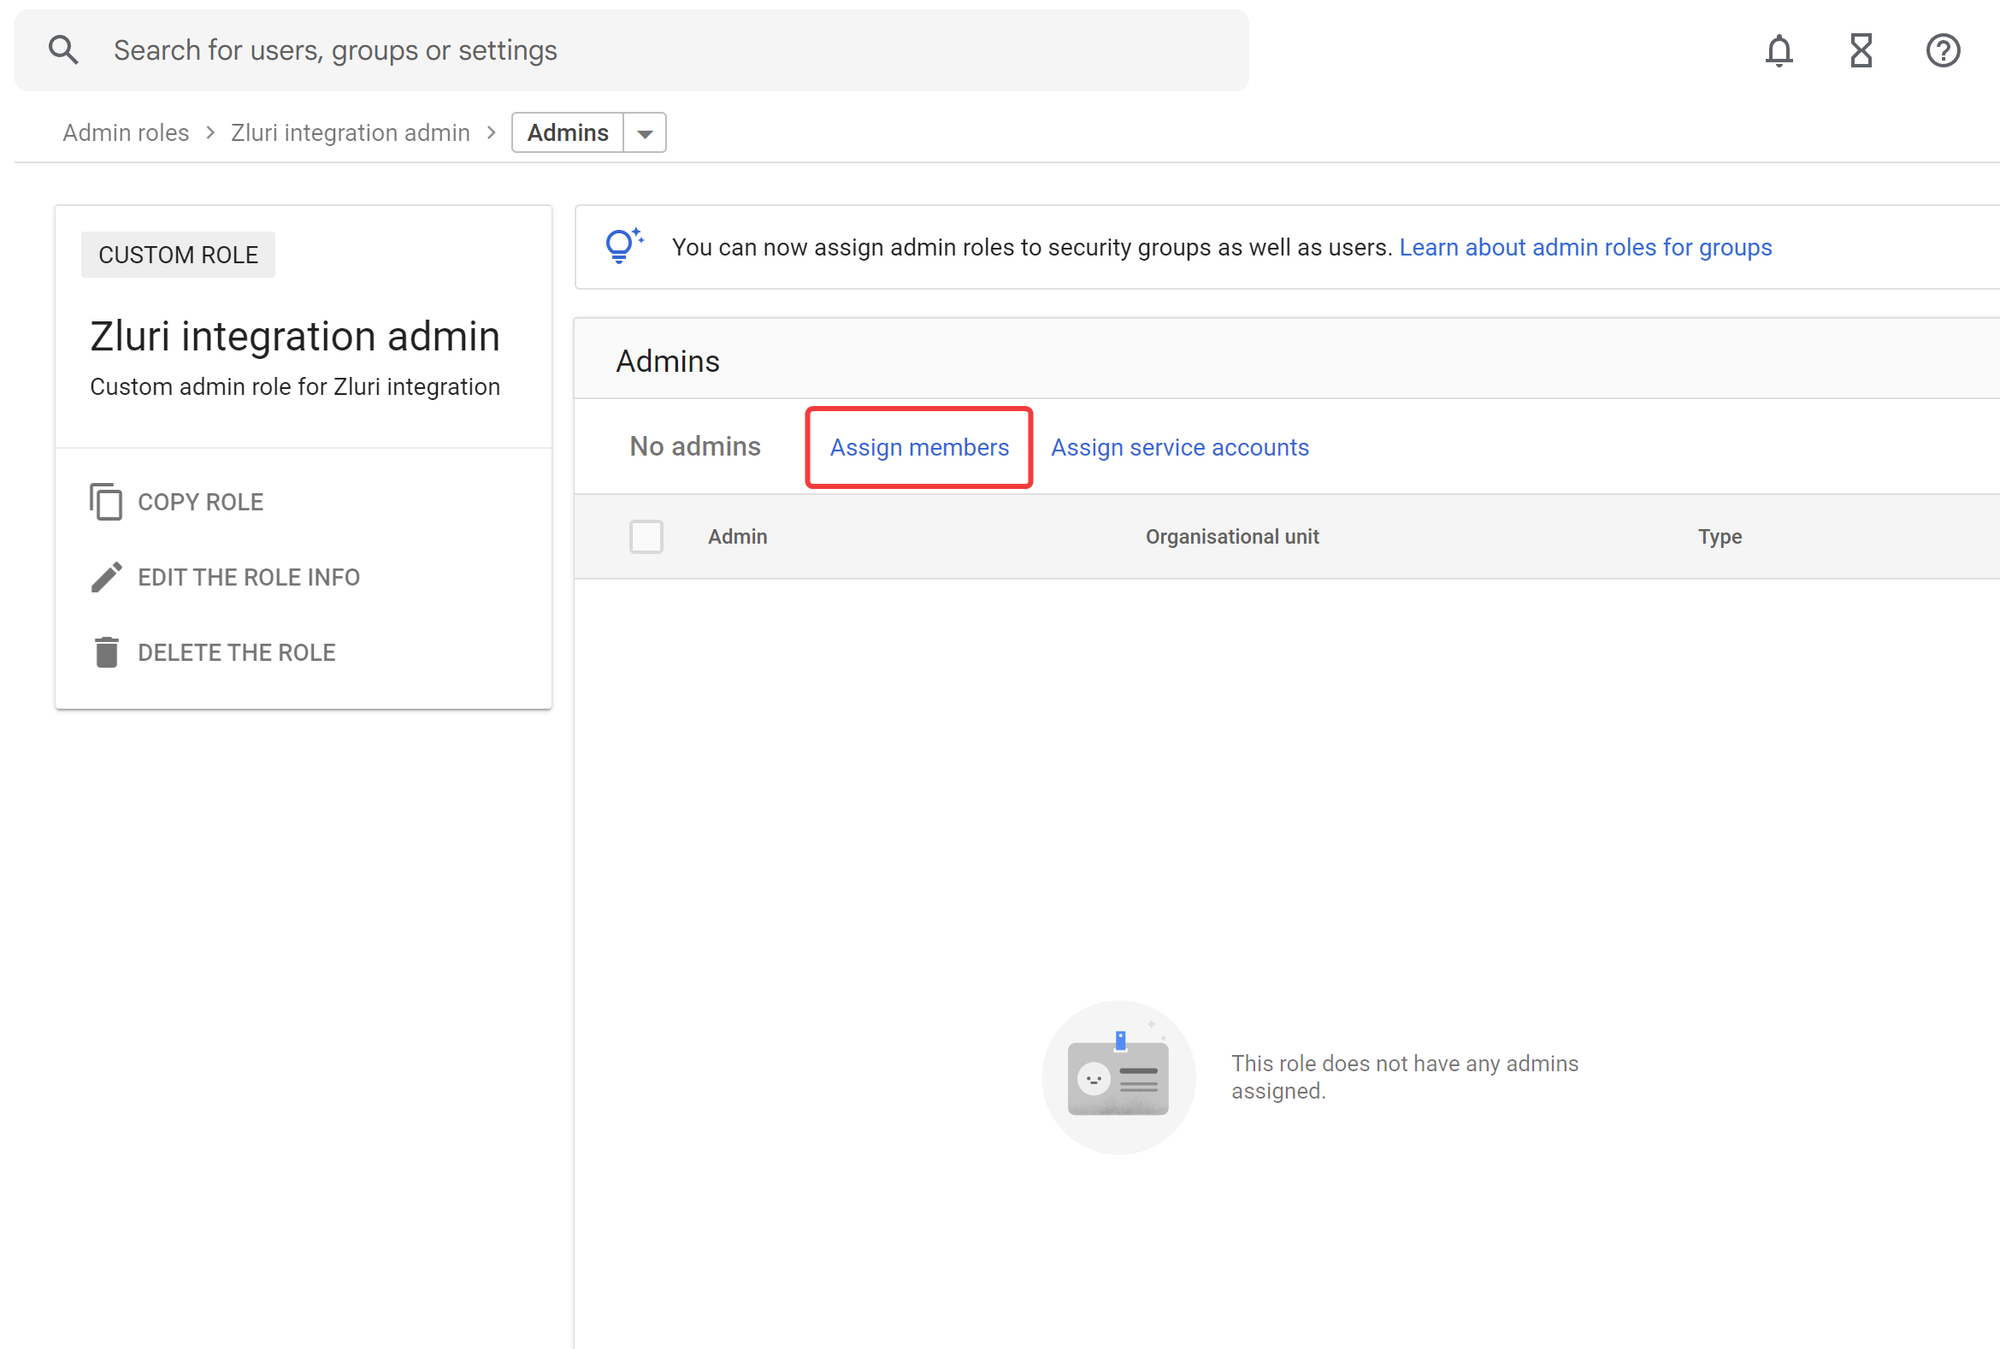
6. Click Assign members.
7. Search for users or groups that you wish to assign the role to, then click Assign role.
Connect Google Workspace to Zluri
8. Visit the Integrations Catalog, search for “workspace”, and click ➕ Connect on the Google Workspace entry.

9. Choose the scopes for the integration, and click Connect. You can click the down-arrow button towards the right of a scope to find out what it does.

10. In the popup window, choose the account that you wish to connect to Zluri.

11. Review the permissions and click Allow.
12. Once connected, modify the connection name and add a description. Click Save, and you’re ready to go!
Was this article helpful?
That’s Great!
Thank you for your feedback
Sorry! We couldn't be helpful
Thank you for your feedback
Feedback sent
We appreciate your effort and will try to fix the article
If you wish to delegate Zluri’s Google Workspace integration to a user or group without Super admin credentials, you can assign them a custom admin role. This method requires more manual configuration, but gives greater control over the Zluri features you wish to use.
? This article explains how to create a role with the bare minimum privileges to connect Google Workspace to Zluri. To learn more about the additional capabilities, see Scopes for Google Workspace.
Prerequisites
- A Business Starter, Business Standard, Business Plus, or Enterprise plan. You can find your payment plan by following these instructions.
- Super admin credentials in Google Workspace.
Integration steps
Create a custom admin role
1. Login to the Admin Dashboard, and navigate to Accounts → Admin Roles in the left sidebar.
2. Click Create new role.
3. Give the role a name and description, and click Continue.
4. In the Select privileges step, choose one set of permissions from the table below.
Minimum required privileges: These are the minimum required privileges required for a connection. They enable features like user discovery, identifying opportunities for cost optimization, and fetching role information for conducting access reviews
Maximum required privileges: These let you use every feature that Zluri offers including workflow-related actions such as automated onboarding and offboarding, access remediation, and running continuous optimization workflows.
| Minimum required privileges | Maximum required privileges | |
|---|---|---|
| Admin console privileges | Organizational units: Read Users: Read Domain Settings Reports Security: User Security Management Security: Security Setting | Organizational units: Read, Write Users: Read, Write Domain Settings Reports Security: User Security Management Security: Security Setting |
| Admin API Privileges | User Security Management Billing management: Billing Read Domain Management Groups: Read License Management: License Read Organization Units: Read Domain Allowlist Management: Domain Allowlist Read Users: Read | User Security Management Billing management: Billing Read Domain Management Groups: Read, Write License Management: License Read, License Write Organization Units: Read, Write Domain Allowlist Management: Domain Allowlist Read, Domain Allowlist Write Users: Read, Write |
5. Click Continue, review the privileges, and click Create role.
Assign the role to a user or group
6. Click Assign members.
7. Search for users or groups that you wish to assign the role to, then click Assign role.
Connect Google Workspace to Zluri
8. Visit the Integrations Catalog, search for “workspace”, and click ➕ Connect on the Google Workspace entry.

9. Choose the scopes for the integration, and click Connect. You can click the down-arrow button towards the right of a scope to find out what it does.

10. In the popup window, choose the account that you wish to connect to Zluri.

11. Review the permissions and click Allow.
12. Once connected, modify the connection name and add a description. Click Save, and you’re ready to go!
Was this article helpful?
That’s Great!
Thank you for your feedback
Sorry! We couldn't be helpful
Thank you for your feedback
Feedback sent
We appreciate your effort and will try to fix the article


